Polymorphic
-
Posts
234 -
Joined
-
Last visited
-
Days Won
9
Polymorphic's Achievements
")


-
 Hello everybody! We're diving into the world of mouse paints and mouse splines. We'll cover what the code is doing, the data structures it's using (hello, circular buffer!), why aiming for 50fps is crucial, and some Big O notation(O(1) to be precise). Let's get painting. What the Code is Doing Our tutorial involves creating and managing various mouse paints, which help us visualize mouse movements and clicks. We have different styles of mouse paints, such as MouseCursorPaint, OriginalMouseCursorPaint, and PlusSignMouseCursorPaint. These classes define how the mouse movements are drawn on the screen. Here's a brief overview of the core components: MouseCursorPaintConfig: Configures the size, colors, and gradients used in the mouse paints. PolymorphicMousePaint: An interface for mouse paint implementations with an additional ripple effect control. MouseCursorPaint, OriginalMouseCursorPaint, PlusSignMouseCursorPaint: Implementations of PolymorphicMousePaint that define different styles of mouse paints. MouseRipple and MouseRipplePaintConfig: Handle the ripple effects when the mouse is clicked. MousePaintThread: The thread that manages the painting of mouse trails and handles the ripple effects. Data Structures: Circular Buffer (Infinite Memory!) A significant part of our implementation uses a circular buffer. Imagine a circular buffer as a conveyor belt with a fixed number of items allowed on it (15 in our case). You add mouse positions in order, and when you run out of space, you go back to the first point and overwrite it. This way, we always keep the latest 15 mouse positions without running out of "memory." Circular Buffer Benefits: Efficiently Manages a Fixed Number of Elements: The buffer maintains a set number of elements (like our 15 mouse positions), ensuring we use a consistent amount of memory. Old Data is Automatically Discarded: As new data comes in, old data is overwritten, keeping the buffer fresh with the latest entries without any manual cleanup. Constant Time Complexity, O(1): Adding, updating, and removing elements in a circular buffer is extremely efficient, as each operation takes a constant amount of time regardless of the buffer size. Extremely Efficient: Circular buffers are known for their efficiency in managing fixed size datasets, making them perfect for real time applications like our mouse trail system. Why 50 FPS? In our mouse paint thread, we're aiming for 50 frames per second (fps). Why? Because smooth visuals matter. At 50fps, the mouse paint animations look fluid and responsive. Here's the math: Tick Rate Calculation: tickRate = 1 second / fps For 50 fps: tickRate = 1000ms / 50fps = 20ms This means our thread updates every 20 milliseconds, ensuring we maintain that buttery smooth animation. Why Delta Time (dt)? When implementing fade effects, it’s crucial to ensure that the animation progresses smoothly and consistently across different frame rates. This is where delta time (dt) comes into play. What is Delta Time (dt)? Delta time (dt) represents the time elapsed between the current frame and the previous frame. By using dt, we can adjust our animations based on the actual time that has passed, rather than relying on a fixed time step. Benefits of Using Delta Time: Frame Rate Independence: Without dt: If the frame rate drops (e.g., from 50 fps to 30 fps), animations would appear slower because the fixed time step remains the same. With dt: The animation speed remains consistent because it adjusts according to the time elapsed between frames. Smooth Animations: Using dt ensures that fade effects (or any time based animations) proceed at the same pace regardless of frame rate fluctuations, leading to smoother transitions and a more polished user experience. The Big O Notation: O(1) In our circular buffer, adding, updating and removing elements have a time complexity of O(1). This means these operations take a constant amount of time, regardless of the buffer size. This efficiency is key for maintaining high performance in real time applications like our mouse point system. Differences in Mouse Paints MouseCursorPaint: Rotates an arc around the mouse position with a gradient and dynamic stroke width. Can activate a ripple effect for click feedback. OriginalMouseCursorPaint: Draws simple cross lines (TRiBot classic). No fancy effects, just the basics. PlusSignMouseCursorPaint: Draws a plus sign at the mouse position. Focuses on clear, precise indicators. The Spline Trail Magic Now, let's talk about drawing those smooth, sleek, and sexy trails using quadratic bézier curves. This is where the real fun begins. We use the MousePaintThread class to handle everything from mouse clicks to drawing the trails. Here’s a quick tour of the important bits: Circular Buffer: Our spline trail is stored using a circular buffer (arrays xPoints, yPoints, colors, head, tail) Quadratic Bézier Curves: When drawing the trail, we use quadratic bézier curves. This math magic helps us create smooth sexy curves between points. Here’s how it works: Points & Path: We keep track of mouse positions in arrays (xPoints, yPoints). These points form the backbone of our trail. GeneralPath: This is where the magic happens. We use a GeneralPath object to draw smooth curves. For each segment of the trail, we move from one point to the next, creating a quadratic bézier curve in between. Curving It Up: We call quadTo() on the GeneralPath to draw curves. It takes three points: the starting point, a control point that determines the curve’s direction, and the ending point. The result? Buttery smooth trails that look like you’re painting with the damn wind! class MousePaintThread( private var mouseSplinePaintConfig: MouseSplinePaintConfig = MouseSplinePaintConfig(), private var mouseCursorPaintConfig: MouseCursorPaintConfig = MouseCursorPaintConfig(), private var mouseRipplePaintConfig: MouseRipplePaintConfig = MouseRipplePaintConfig(), private var mouseCursorPaint: PolymorphicMousePaint = MouseCursorPaint(mouseCursorPaintConfig) ) : Thread("Mouse Paint Thread"), Consumer<Graphics2D>, MouseClickListener { private val maxPoints = 15 private val xPoints = IntArray(maxPoints) private val yPoints = IntArray(maxPoints) private val colors = IntArray(maxPoints) { mouseSplinePaintConfig.trailColor.rgb } private val trailPath = GeneralPath() private var pointCount = 0 private var head = 0 private var tail = 0 private var lastMouseX = -1 private var lastMouseY = -1 private var lastUpdateTime = currentTimeMillis() private val ripples = synchronizedList(mutableListOf<MouseRipple>()) private var clickCount = 0 fun configure( mouseCursorPaintConfig: MouseCursorPaintConfig, mouseSplinePaintConfig: MouseSplinePaintConfig, mouseRipplePaintConfig: MouseRipplePaintConfig, polymorphicMousePaint: PolymorphicMousePaint ) { this.mouseCursorPaintConfig = mouseCursorPaintConfig this.mouseSplinePaintConfig = mouseSplinePaintConfig this.mouseRipplePaintConfig = mouseRipplePaintConfig this.mouseCursorPaint = polymorphicMousePaint setMousePaint(this.mouseCursorPaint) } override fun mouseClicked( point: Point, mouseButton: Int, isBot: Boolean ) { val color = when (clickCount) { 0 -> mouseRipplePaintConfig.rippleColorOne 1 -> mouseRipplePaintConfig.rippleColorTwo else -> mouseRipplePaintConfig.rippleColorThree } addRipple(MouseRipple(center = point, color = color)) // Reset after 3 ripples clickCount = (clickCount + 1) % 3 } override fun run() { addMouseClickListener(this) addPaint(this) setMousePaint(mouseCursorPaint) setMouseSplinePaint { _, _ -> } while (true) { // We want 50 fps (max limit) wait(20) val currentTime = currentTimeMillis() val deltaTime = currentTime - lastUpdateTime val mousePos = getPos() addPoint(mousePos.x, mousePos.y) fadeEffect(deltaTime) synchronized(ripples) { val iterator = ripples.iterator() while (iterator.hasNext()) { mouseCursorPaint.isRippleActive = true val ripple = iterator.next() if (ripple.expanding) { ripple.radius += 4 ripple.alpha -= 8 if (ripple.radius >= 50) { // When the radius reaches 50, start contracting ripple.expanding = false } } else { ripple.radius -= 4 ripple.alpha += 8 if (ripple.radius <= 5 || ripple.alpha >= 255) { // When the radius is too small, or alpha is back to max, remove iterator.remove() mouseCursorPaint.isRippleActive = false } } } } lastUpdateTime = currentTime } } override fun accept(g2: Graphics2D) = draw(g2) private fun addRipple(ripple: MouseRipple) = synchronized(ripples) { ripples.add(ripple) } private fun addPoint(x: Int, y: Int) { // Mouse hasn't moved, so don't add a new point if (x == lastMouseX && y == lastMouseY) return // Update last mouse position lastMouseX = x lastMouseY = y xPoints[head] = x yPoints[head] = y colors[head] = mouseSplinePaintConfig.trailColor.rgb head = (head + 1) % maxPoints if (pointCount < maxPoints) { pointCount++ } else { tail = (tail + 1) % maxPoints } } private fun fadeEffect(deltaTime: Long) { // Ensure a minimum fade amount val fadeAmount = (deltaTime * 10 / 50).coerceAtLeast(1) for (i in 0 until pointCount) { val index = (tail + i) % maxPoints val currentAlpha = colors[index] ushr 24 val newAlpha = (currentAlpha - fadeAmount).coerceIn(0, 255) colors[index] = (((newAlpha shl 24) or (colors[index] and 0x00FFFFFF).toLong()).toInt()) } } private fun draw(g: Graphics2D) { g.setRenderingHint(RenderingHints.KEY_ANTIALIASING, RenderingHints.VALUE_ANTIALIAS_ON) if (pointCount >= 3) { // IMPORTANT: Reset the path before iteration trailPath.reset() for (i in 0 until pointCount - 2) { val index = (tail + i) % maxPoints val nextIndex = (index + 1) % maxPoints trailPath.moveTo(xPoints[index].toFloat(), yPoints[index].toFloat()) val midX = (xPoints[index] + xPoints[nextIndex]) / 2f val midY = (yPoints[index] + yPoints[nextIndex]) / 2f trailPath.quadTo(midX, midY, xPoints[nextIndex].toFloat(), yPoints[nextIndex].toFloat()) val color = Color(colors[index], true) val nextColor = Color(colors[nextIndex], true) val gradient = GradientPaint(xPoints[index].toFloat(), yPoints[index].toFloat(), color, midX, midY, nextColor) g.paint = gradient g.draw(trailPath) trailPath.reset() } } synchronized(ripples) { for (ripple in ripples) { g.color = Color(ripple.color.red, ripple.color.green, ripple.color.blue, ripple.alpha) g.drawOval( ripple.center.x - ripple.radius.toInt(), ripple.center.y - ripple.radius.toInt(), (ripple.radius * 2).toInt(), (ripple.radius * 2).toInt() ) } } } } Wrapping Up Congratulations! You've successfully transformed simple mouse movements into visually captivating trails using circular buffers, quadratic bézier curves, and smooth animations. Remember, this is just the beginning. Feel free to experiment with different colors, sizes, and effects to tailor the visuals to your unique style. Happy coding, and may your mouse trails always be smooth and sexy! Github: https://github.com/its-jackson/tribot-mouse-paints
-
What are Behavior Trees? Behavior Trees (BTs) are a formal, graphical modeling language primarily used in robotics and artificial intelligence for creating complex behaviors from simpler ones. They represent a tree structure where nodes define the actions, conditions, and control flow. These nodes can be sequences, selectors, parallels, or decorators that control the execution flow based on conditions and outcomes of the nodes. Applications of Behavior Trees Behavior Trees are versatile and can be applied in various domains, particularly in robotics and automation: Automated Ground Vehicles: BTs manage complex navigation tasks and decision-making processes. Robotic Manipulators: BTs handle the intricate movements and coordination required for robotic arms. Humanoid and Quadruped Robots: BTs enable the creation of natural and adaptive behaviors for robots that mimic human or animal movements. Semi-autonomous Drones: BTs allow drones to perform tasks autonomously while maintaining the ability to react to dynamic environments. Social Robots: BTs help in creating interactive and adaptive behaviors for robots designed to interact with humans. Behavior Trees are also used in military applications, where they control the behavior of autonomous vehicles, robots, and other automated systems. Key Features of Behavior Trees Think in Terms of Actions, Not States Unlike state machines, behavior trees emphasize executing actions rather than transitioning between states. Each node in a behavior tree represents an action or a decision point, making it more intuitive to model complex behaviors. Build Extensible and Hierarchical Behaviors Behavior Trees are composable, allowing you to build complex behaviors by reusing simpler ones. This hierarchical structure makes it easier to manage and extend behaviors without significantly altering the existing tree. What are State Machines? State Machines (SMs) are a mathematical model used to design systems that can be in one of a finite number of states at any given time. They consist of states, transitions between states, and actions triggered by those transitions. State Machines are particularly effective in scenarios where the system's behavior can be clearly delineated into distinct states and the transitions between them are well-defined. Applications of State Machines State Machines are widely used in various fields due to their clarity and simplicity in representing complex logic: Embedded Systems: SMs manage the control logic for hardware devices. Game Development: SMs control game character behaviors, UI navigation, and game state transitions. Software Engineering: SMs handle workflow automation, process management, and user interface states. Key Features of State Machines Clarity and Simplicity State Machines provide a clear and straightforward way to represent complex logic through states and transitions. This makes it easier to understand and debug the system's behavior. Deterministic Behavior State Machines ensure that the system behaves predictably based on the current state and input events. This deterministic nature is crucial for systems that require high reliability and predictability. Well-Suited for Sequential Logic State Machines excel in scenarios where the system needs to follow a specific sequence of steps or where the behavior can be clearly divided into discrete states. Summary Both Behavior Trees and State Machines offer unique advantages and are suitable for different types of applications. Behavior Trees are ideal for robotics and automation where hierarchical, modular, and flexible behavior modeling is needed. State Machines are perfect for applications requiring clear, sequential, and deterministic logic. Understanding the strengths and applications of each can help in choosing the right approach for designing complex systems and behaviors. (Most of this was chatgpt generated, using a big prompt with my knowledge).
-
Hello fellow botters, programmers, gamers, and enthusiasts, I'm excited to share the progress of my journey and the lessons learned along the way. My name is Jackson Johnson, and like many of you, I've encountered challenges and setbacks. However, I firmly believe that these experiences are opportunities for growth and improvement. Remastering Success: Recently, I successfully remastered my last script, showcasing my commitment to continuous enhancement and innovation. Building on this success, I am thrilled to announce my upcoming project, which promises to be even better, more innovative, and a true masterpiece never seen before. Embracing Vonderhaar's Ideology: Central to my development philosophy is David Vonderhaar's ideology, which has profoundly influenced my approach to programming: Deep Understanding of the Game: I prioritize gaining a deep understanding of OSRS mechanics, gameplay nuances, and player preferences. This knowledge forms the foundation of my scripts, ensuring they align seamlessly with player needs. Engagement with the Community: Active participation in forums, discussions, and community interactions allows me to stay attuned to user feedback, suggestions, and evolving trends. This engagement fuels iterative improvements and fosters a stronger bond within the community. Iterative Development: Following an iterative development model, I continuously refine and enhance my scripts based on user feedback and real-world testing. This iterative approach ensures that my solutions are robust, reliable, and tailored to meet user expectations. Quality and Reliability: My scripts prioritize quality and reliability, delivering consistent performance without interruptions or errors. I strive to exceed user expectations by providing scripts that are efficient, effective, and user-friendly. Continuous Learning and Improvement: Learning is a lifelong journey, and I am committed to staying updated with the latest OSRS updates, programming techniques, and industry best practices. This commitment to continuous learning empowers me to adapt, innovate, and excel in script development. Planning for the Future: Looking ahead, I am dedicated to pushing boundaries, exploring new ideas, and creating scripts that set new standards of excellence. My upcoming project embodies this spirit of innovation, featuring: Enhanced automation and customization capabilities. Innovative features tailored to player needs and feedback. A modern and intuitive user interface for seamless user experience. Comprehensive support for various gameplay styles and account types. Optimized performance and reliability for uninterrupted gameplay. Remember this, a true master is an eternal student. Best regards, Jack
-
I took a quick glance at your script, and I have to say, you did a decent job for your (first?) script. Keep pushing forward and improving. One thing I noticed is that you're using a while (true) loop and throwing runtime exceptions to end the script. Instead, you could use a control flag to end the script gracefully. For example, you can use a boolean flag to control the loop and set it to false when you need to end the script. Additionally, you can keep a count of failed attempts. If the count exceeds a certain limit, say 10 failures, you can end the script. Reset the count to 0 whenever an action succeeds. This way, you can handle errors gracefully. boolean running = true; int failureCount = 0; int maxFailures = 10; while (running) { if (performAction()) { // Assume performAction() returns a boolean failureCount = 0; // Reset on success } else { failureCount++; if (failureCount >= maxFailures) { running = false; // End script gracefully } } }
-
Hello fellow botters, programmers, gamers, and enthusiasts, I want to share with you my journey, my failures, and my plans for a triumphant comeback. My name is Jackson Johnson, and like many of you, I've experienced setbacks and challenges in my coding endeavors. However, I believe that failures are stepping stones to success, and I'm excited to outline my path forward. Overhauling the Wintertodt Script: One of my current projects involves a significant overhaul of my Wintertodt script. I'm revisiting the script with a fresh perspective, aiming to enhance its automation, customization, efficiency, reliability, and functionality. This overhaul represents a commitment to continuous improvement and a dedication to delivering high quality solutions. Innovative Features Based on Player Needs: In this overhaul, I'm focusing on innovative features that directly address player needs and demands. These include: Automatic clue hunter outfit gathering to streamline gameplay. Automatic Druidic Ritual quest completion to heal the pyromancer. Automatic PoH for construction XP, enhancing efficiency. Full iron man support with improved cake food item usage and teleportation strategies. Full non-iron man support for a seamless experience across all account types. Solo/mass playing style support for versatile gameplay options. Automatic pyromancer outfit acquisition for enhanced character customization. Automatic prayer usage. Automatic regular firemaking until 50 firemaking level for skill progression. GE restocking capabilities for efficient resource management. New Swing GUI rework for a modern and intuitive user interface. Embracing Vonderhaar's Strategies: My programming ideology is deeply influenced by David Vonderhaar's strategies for success now: Deep Understanding of the Game: Striving to have an in-depth knowledge of OSRS mechanics, gameplay elements, and community preferences. Engagement with the Community: Actively engaging with the our community, participating in forums, discussions, and sharing insights. Iterative Development: Following an iterative development process, gathering feedback, and improving scripts based on user input. Quality and Reliability: Ensuring that scripts perform tasks effectively, efficiently, and without disruptions. Continuous Learning and Improvement: Learning new techniques, staying updated with OSRS updates, and refining scripts iteratively. Innovative Script Ideas: Focusing on unique and innovative script ideas that add value to users. Documentation and Communication: Providing clear documentation and effective communication with users. Planning for a Comeback: My ultimate goal is to make a significant comeback in the botting scene. I'm channeling my passion and dedication, into projects that push boundaries, deliver exceptional value, and resonate with users. Through continuous learning, engagement with the community, and a relentless pursuit of excellence, I am confident in my ability to achieve success.
-
v0.2 -> Fixed looting bug, not prioritizing lighting up candle. v0.3 -> Patched NPE in Frostbyte Walker when path is empty.
-
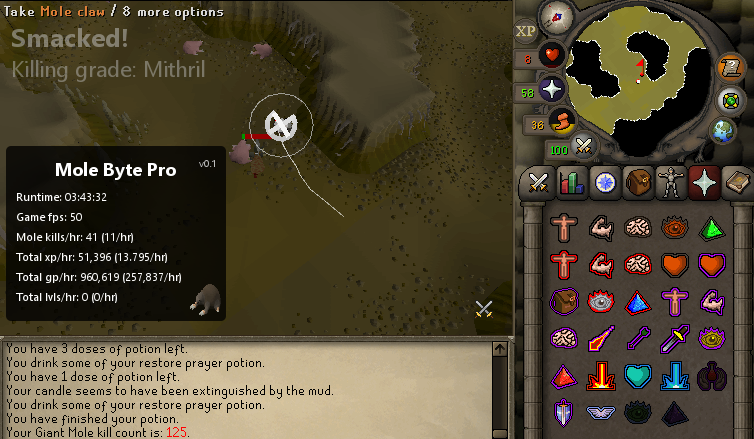
Molebyte Pro - Powered By Polymorphic's Frostbyte Engine Introduction Welcome to Molebyte Pro, an advanced Old School RuneScape (OSRS) script powered by Polymorphic's Frostbyte Engine, designed for scripting excellence. With a focus on automation and customization, Molebyte Pro offers a comprehensive set of features to enhance your gameplay experience. Description Automatic Prayer Management: Effortlessly manage your prayers with intelligent automation. Automatic Potion Usage: Keep your stats boosted with automatic potion usage for various needs like stamina, combat, and more. Automatic Eating: Ensure your character stays nourished with automatic eating functionality. Automatic World Hopping: Seamlessly switch between worlds, enhancing your efficiency and avoiding crowded or competitive areas. Automatic Dwarven Rock/Location Orb: Seamlessly handle Dwarven Rock or Location Orb usage with precision. Automatic Light Sources: Stay illuminated in dark areas with support for light sources: candles, black candles, torches, oil lamps, all lanterns, bruma torch, fire of eternal light, firemaking cape, any max cape. Automatic Dharoks Repair: Maintain your Dharoks set automatically, saving you time and effort. Automatic GE Restocker: Keep your supplies stocked with automatic restocking from the Grand Exchange. Automatic Looting: Collect loot efficiently with automatic looting capabilities. Automatic Mole Tracking: Track and engage with the Giant Mole boss using advanced tracking features, including support for Falador 3 shield and random patrolling behavior. Automatic Progressive Combat: Engage in combat automatically with progressive strategies for efficient leveling. Automatic Bury Bones: Automatically bury picked-up bones for streamlined inventory management. Custom Pathing: Navigate the game world with custom pathing options for optimal efficiency. Custom Paint Graphics: Visualize your script's actions with customizable paint graphics for a clear overview. Behavior Trees: Utilize behavior trees for intelligent decision-making and task execution. Extensive Customization: Tailor your experience with options like looting blacklists, repair degrade level settings for Barrows equipment, and more. Why Frostbyte Engine The Frostbyte Engine, developed by Polymorphic, is renowned for its reliability, performance, and advanced scripting capabilities. Molebyte Pro leverages this powerful engine to deliver a seamless and feature rich OSRS scripting experience, ensuring high quality automation and customization options for players. Current Beta Features Molebyte Pro currently supports the use of Falador tabs for escape teleporting, providing a quick and efficient way to navigate out of dangerous situations in the lair. Future Development In the upcoming updates, I plan to expand Molebyte Pro's functionality by introducing the ability to sell loot automatically. This enhancement will streamline the looting process and maximize your earnings with minimal effort. Additionally, I aim to incorporate more methods for teleporting out of the lair, offering flexibility and customization based on player preferences. These new teleportation options will further enhance the script's versatility and adaptability to different gameplay scenarios. Stay tuned for these exciting additions, as Molebyte Pro continues to evolve and provide advanced automation solutions for your OSRS adventures! How to Download Download the Molebyte Pro script from here. Fire up your tribot client and set OpenGL to be ON, and load the script. Tweak settings in the Compose UI to match your preferences. Save your settings and launch the script. Proggies Compose UI
-
Added new feature -> Automatically upgrade equipment when new pyromancer piece becomes available.
-
Fixed -> Set up phase error causing script to abruptly end. Fixed -> When player starts in the game region during setup, would not leave sometimes and fail. Fixed -> Now the script will wait at the lobby if near death (No food, low health). Fixed -> Sometimes would not bank correctly after a wintertodt game has end.
-
Watch the bot in action now!
-
The M1 chip is known for its efficiency and performance, but 8GB of RAM might be limiting if you plan to run multiple bots concurrently
-
I could make this, if no other scripter wants it.
-
Hello users, Some new exciting updates and fixes. Here's a breakdown of what's new: Fixes: Restock Zero Items Malfunction: I've resolved the issue causing restock zero items malfunction. You should now be able to restock items without any hiccups. Combat Potions Optimization: Super and regular combat potions will no longer consume doses as frequently, providing a smoother combat experience. Falling Stones Interaction: I've fixed the problem where players would return to the tile where a stone fell, even after moving away. Additions: Client Args Support: I've introduced client args support for greater flexibility and customization options. Customizable Eating Threshold: You can now configure your eating preferences based on health percentage, allowing for more personalized gameplay. Adjustable Mouse Speed: With the new configuration option, you can set your preferred mouse speed for precise control. Progressive Combat: Say hello to progressive combat! Now, your attack styles will switch dynamically based on your combat stat levels, optimizing your fighting strategy. Target Prioritization: I've implemented a feature to almost always prioritize killing giant rats, especially for lower level players. Additionally, the system will attempt to get at least one hit in on the boss while dealing with giant rats.
-
Do you mind sharing some important information with me. What operating system were you using when trying to load my gui? What launcher settings? Anything like that could really help me!